This article includes links to outside resources. We are not responsible for the content on the external site. If there is a link that does not work, please email [email protected] and we will attempt to adjust the information with an updated link.
A great tool that comes along with your CRM allows you to create and import Office Word templates for Engage. With one click, users can generate standardized documents that are automatically populated with data. Below are the steps to create a template, upload it back into your CRM, and use the template document.
Create a Word Template
To get started, you can create a Word template from two different places:
- From the Settings page: Settings > Advanced Settings > Templates > Document Templates > New(
 ). You’ll need sufficient permissions to access to the Settings page.
- From a record: Open a Relationship record . Go to Relationships > All Relationships. Click a Relationship record to open it, and then click Word Templates (or More (…) > Word Templates) > Download Word Template. Templates created here are personal and available only to the user creating the template.
We are going to walk you through the steps from the Settings page.
- Click Word Template > Select data: Filter by Entity > Select Relationship (for this example)

- The relationship selection page appears and here, choose your Entity Relationship

- Click Download Template on the Select Entity page to create a Word file on your local computer. In the new document, the exported Entity will be included as XML data.
Entity Relationships
This screen requires an understanding of your data structure. Your system administrator can provide information about how your Entities are related. The relationships you select on this screen determine what entities and fields are available later when you define the Word template. Only select relationships you need to add data to the Word template. Below is some overall information about the data structure in Engage. Please remember when you're looking at the information below, Account is equivalent to a Relationship in Engage. To better suit Wealth Management structures, Engage uses the term Relationship, rather than Account.
Entity's relationships define the way that entity records can be associated with records from other entities or the same entity. There are two types of entity relationships.
- One-to-many relationships. In a one-to-many entity relationship, many referencing (related) entity records can be associated with a single referenced (primary) entity record. The referenced entity record is sometimes referred to as the ”parent” and records of the referencing entity are referred to as ”children.” A many-to-one relationship is just the child perspective of a one-to-many relationship.
- Many-to-many relationships. In a many-to-many entity relationship many entity records can be associated with many other entity records. Records related using a many-to-many relationship can be considered peers and the relationship is reciprocal.
Here are some examples for the Account entity.
| Relationship | Description |
|---|---|
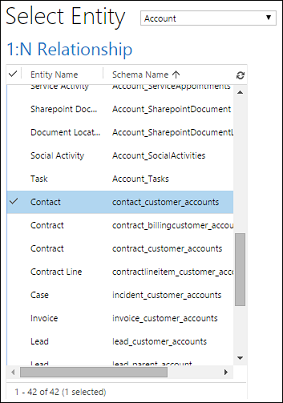 |
An account can have multiple contacts. |
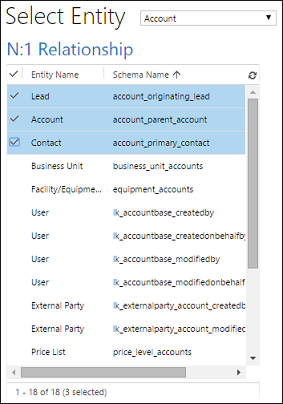 |
A lead, account, or contact can have multiple accounts. |
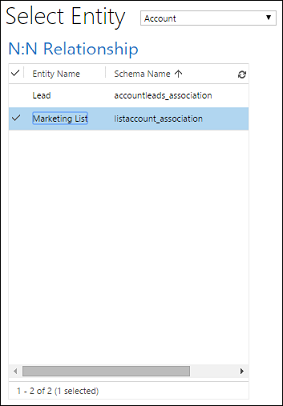 |
An account can have multiple marketing lists. A marketing list can have multiple accounts. |
Enable the Developer Tab in Word
For you to be able to use data from your CRM in Word, you will need to make sure you have the Developer Tab enabled within Word. If you already have the Developer tab enabled on your Microsoft Word, you can skip this part.
To see and add fields from your CRM data, you need to enable the Word Developer tab.
- Go to File > Options > Customize Ribbon, and then enable Developer.

- Click OK.
- Developer now appears in the Word ribbon.

Define the Word template
You use the XML Mapping Pane to add entity fields to your Word template. Be sure to only add fields as Plain Text or Picture.
- Do not make any textual changes to the added content control.
- You can make formatting changes to content control fields, such as bolding the text, but no other textual changes, including capitalization changes.
- If you experience Word freezing or performance degradation, try turning off AutoCorrect.
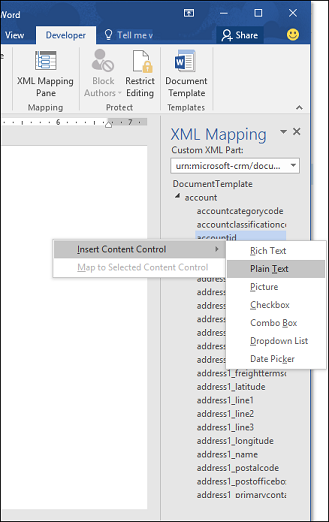
1. In your Word template, click Developer > XML Mapping Pane.

2. Select the XML schema. It will begin with “urn:microsoft-crm/document-template/”.

3. Expand the entity, right-click the entity field, and then click Insert Content Control > Plain Text.

4. The entity field is added to the Word template.

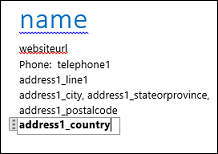
5. Add additional entity fields, add descriptive labels and text, and format the document.
A completed template might look like this:

Note: Some content control fields you entered likely have multiple lines of data. For example, Relationships have more than one Contact. To include all the data in your Word template, set the content control field to repeat.
Upload the Word template back into Engage
Administrators - Firm Wide Templates
When you have your Word template built the way you want, save it so you can upload it into Engage. Access to the newly created Word template depends on how you uploaded it and to the access granted to the security role. Be sure to check out Use Security Roles to control access to templates. Administrators can use the Settings page to upload the Word template into Engage. A template uploaded in Settings is available to all users in your organization.
- Go to Settings > Templates > Document Templates
- Click Upload Template
- Drag the Word file in the dialog box or browse to the file

- Click Upload
Daily Users - Personal Templates
All users can upload a template for their own use from a list of records. This can be for non-admins or admins wanting to create a personal template.
- Open a single record, like a Relationship
- Click More (…) > Word Templates > Create Word Template: Upload Template

- Choose your Word file
- Click Upload
Generate a document from the Word template
To use the Word template you’ve created, do the following:
- Open a record with information you want to create a document. For example, open a Relationship record.
- Click More (…) > Word Templates, and then under Word Templates select the template you created.

Notes about Word Templates:
- There is a known issue when creating templates in Word. This topic contains information on how to prevent interactions that could potentially destabilize Word. See: Important! A known issue and how to avoid it.
- Macro-enabled Word documents (.docm) are not supported.
- To create a Word template, and use it within Engage, you must have Word 2013 or 2016.


